Go back
An introduction to load balancers and API Gateways using NGINX
When I started studying system design, load balancer was one of those words I’d see in every architecture diagram but never really stopped to understand. It felt like something for big companies, you know? The kind that run thousands of servers in parallel. Then I realized that understanding the concept — regardless of scale — completely changes how you think about building systems. And the best place to start is getting your hands dirty with NGINX.
In this post I want to show you what a load balancer is, what an API Gateway is, how the two fit together in a system, and how to configure all of it in practice.
What is a Load Balancer?
Think of it this way: you have a grocery store with a single checkout lane. Ten people show up at the same time. The cashier is going to lose it (or crash). Now imagine the store opens four more lanes and puts someone at the entrance to direct customers between them. That person is the load balancer.
In practice, a load balancer receives incoming requests and distributes them across multiple instances of a service. The goal is to prevent a single server from getting overwhelmed while the others sit idle.
But it’s not just about load. The load balancer is also a piece of resilience. If one of the instances goes down, it stops sending requests to it. The system keeps running without the user ever noticing.
The distribution algorithms
How the load balancer decides which server to send each request to depends on the configured algorithm. The most common ones are:
Round Robin — The NGINX default. Each request goes to a different server, in sequence. Server 1, Server 2, Server 3, back to 1. Simple and works well when instances have similar capacity.
Least Connections — Sends the request to the server with the fewest active connections at that moment. Useful when requests have very different processing times.
IP Hash — Uses the client’s IP to decide which server will handle it. The same client always lands on the same server. This matters when you need to maintain session state (although modern applications tend to solve this in other ways).
Weighted Round Robin — A variation of Round Robin where you define weights. If Server A has twice the capacity of Server B, you configure it to receive twice as many requests.
In NGINX, switching algorithms is just a matter of adding a directive to the upstream block. I’ll show that further ahead.
What is an API Gateway?
If the load balancer is the checkout lane director at the grocery store, the API Gateway is the reception desk of the entire building.
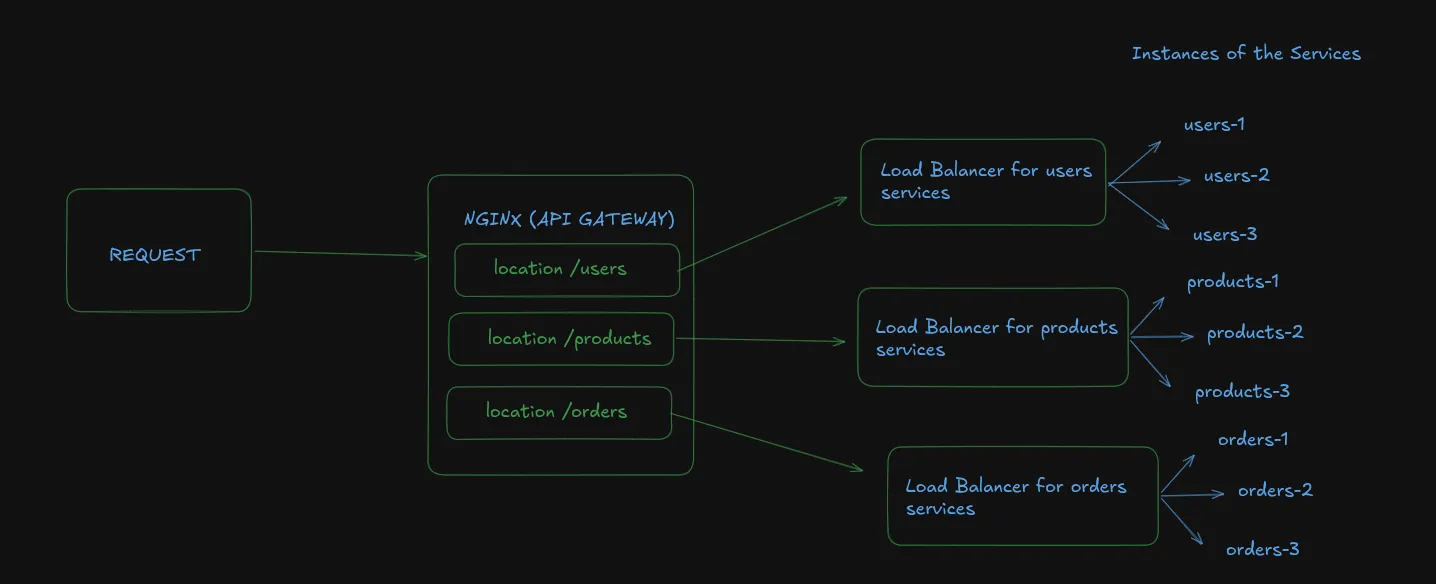
It’s the single entry point for all external requests to your services. Instead of the client knowing the address of each microservice — /users, /orders, /products — it only knows the gateway. The gateway receives the request, identifies which service it belongs to, and routes it.
Beyond routing, an API Gateway can centralize several cross-cutting concerns: authentication, rate limiting, logging, CORS, request transformation. You stop repeating these configurations in every service and put everything in one place.
That’s exactly what NGINX does when configured as an API Gateway: it inspects the request path and decides which upstream to forward it to.
The practical example
The repository with the files is at github.com/Viilih/nginx-resources🔗. Let me walk you through what’s set up there.
The structure has three simulated services (called users, products, and orders), each running on multiple instances via Docker Compose. NGINX acts as the API Gateway at the entry point and as the load balancer in front of each set of instances.
The docker-compose.yml brings everything up together: NGINX and the service instances. NGINX is exposed on port 8080 to the outside world.
The core NGINX configuration looks like this (simplified):
upstream users {
    server users-1:3000;
    server users-2:3000;
    server users-3:3000;
}

upstream products {
    server products-1:3000;
    server products-2:3000;
}

server {
    listen 80;

    location /users/ {
        proxy_pass http://users/;
    }

    location /products/ {
        proxy_pass http://products/;
    }
}
Each upstream block defines a group of servers. The server block plays the API Gateway role: depending on the request path, it routes to the correct upstream.
When you hit localhost:8080/users/health, NGINX captures that request, sees that the path starts with /users/, and distributes it across the three users instances using Round Robin by default.
Changing the load balancer algorithm
Want to use Least Connections instead of Round Robin? Just add one line:
upstream users {
    least_conn;
    server users-1:3000;
    server users-2:3000;
    server users-3:3000;
}
For IP Hash:
upstream users {
    ip_hash;
    server users-1:3000;
    server users-2:3000;
    server users-3:3000;
}
And for Weighted Round Robin:
upstream users {
    server users-1:3000 weight=3;
    server users-2:3000 weight=1;
    server users-3:3000 weight=1;
}
(In this case, users-1 receives three times more requests than the other two. Useful when one instance has more resources allocated.)
How does the system behave when something fails?
This is the part I find most interesting to test in practice.
NGINX has a default passive health check behavior. This means it doesn’t actively verify whether servers are alive — it finds out a server is down when a request fails.
You can configure the number of failures before marking a server as unavailable and how long it stays out of rotation:
upstream users {
    server users-1:3000 max_fails=3 fail_timeout=30s;
    server users-2:3000 max_fails=3 fail_timeout=30s;
    server users-3:3000 max_fails=3 fail_timeout=30s;
}
With this configuration, if users-1 fails three times within 30 seconds, NGINX stops sending requests to it for 30 seconds. Then it tries again. If the server recovered, it’s back in rotation. If it’s still failing, the cycle continues.
To test this on the repository project, you can bring down one of the instances with docker stop <container> and observe that the requests keep being handled normally by the other instances.
NGINX Open Source doesn’t have native active health checking — that’s available in the Plus (paid) version. If you need active verification in production with the open source version, there are alternatives like using the nginx_upstream_check_module module or delegating that to another layer of your infrastructure.
One important thing before wrapping up
Everything we covered here is an introduction. NGINX is one of the tools you can use as a load balancer and API Gateway, but it’s far from the only one. There are dedicated solutions like HAProxy, Traefik, Kong, AWS ALB, among others — each with its own characteristics, strengths, and use cases. I’ll cover those alternatives in future posts focused on system design, where we can compare each one more carefully.
For now, NGINX is a great starting point because it’s simple to configure, has plenty of documentation, and gives you a concrete picture of how these concepts work before moving on to more specialized tools.
If you want to check out the repository I’ve been using for studying: github.com/Viilih/nginx-resources🔗. Bring up the Docker Compose, take down an instance, change the upstream algorithm, and observe the behavior.
Stay hydrated, take care of your logs, and don’t deploy on a Friday :)